Preparing an Android app for release
During a typical development cycle,
you test an app using flutter run at the command line,
or by using the Run and Debug
options in your IDE. By default,
Flutter builds a debug version of your app.
When you’re ready to prepare a release version of your app, for example to publish to the Google Play Store, this page can help. Before publishing, you might want to put some finishing touches on your app. This page covers the following topics:
- Adding a launcher icon
- Signing the app
- Enabling Proguard
- Reviewing the app manifest
- Reviewing the build configuration
- Building the app for release
- Publishing to the Google Play Store
- Updating the app’s version number
- Android release FAQ
Adding a launcher icon
When a new Flutter app is created, it has a default launcher icon. To customize this icon, you might want to check out the flutter_launcher_icons package.
Alternatively, you can do it manually using the following steps:
-
Review the Material Design product icons guidelines for icon design.
-
In the
<app dir>/android/app/src/main/res/directory, place your icon files in folders named using configuration qualifiers. The defaultmipmap-folders demonstrate the correct naming convention. -
In
AndroidManifest.xml, update theapplicationtag’sandroid:iconattribute to reference icons from the previous step (for example,<application android:icon="@mipmap/ic_launcher" ...). -
To verify that the icon has been replaced, run your app and inspect the app icon in the Launcher.
Signing the app
To publish on the Play Store, you need to give your app a digital signature. Use the following instructions to sign your app.
Create a keystore
If you have an existing keystore, skip to the next step. If not, create one by running the following at the command line:
On Mac/Linux, use the following command:
keytool -genkey -v -keystore ~/key.jks -keyalg RSA -keysize 2048 -validity 10000 -alias key
On Windows, use the following command:
keytool -genkey -v -keystore c:/Users/USER_NAME/key.jks -storetype JKS -keyalg RSA -keysize 2048 -validity 10000 -alias key
Reference the keystore from the app
Create a file named <app dir>/android/key.properties
that contains a reference to your keystore:
storePassword=<password from previous step>
keyPassword=<password from previous step>
keyAlias=key
storeFile=<location of the key store file, such as /Users/<user name>/key.jks>
Configure signing in gradle
Configure signing for your app by editing the
<app dir>/android/app/build.gradle file.
-
Replace the following:
android {With the keystore information from your properties file:
def keystoreProperties = new Properties() def keystorePropertiesFile = rootProject.file('key.properties') if (keystorePropertiesFile.exists()) { keystoreProperties.load(new FileInputStream(keystorePropertiesFile)) } android { -
Replace the following:
   buildTypes {
       release {
           // TODO: Add your own signing config for the release build.
           // Signing with the debug keys for now,
           // so `flutter run --release` works.
           signingConfig signingConfigs.debug
       }
   }
With the signing configuration info:
   signingConfigs {
       release {
           keyAlias keystoreProperties['keyAlias']
           keyPassword keystoreProperties['keyPassword']
           storeFile file(keystoreProperties['storeFile'])
           storePassword keystoreProperties['storePassword']
       }
   }
   buildTypes {
       release {
           signingConfig signingConfigs.release
       }
   }
Release builds of your app will now be signed automatically.
Enabling Proguard
By default, Flutter does not obfuscate or minify the Android host. If you intend to use third-party Java, Kotlin, or Android libraries, you might want to reduce the size of the APK or protect that code from reverse engineering.
For information on obfuscating Dart code, see Obfuscating Dart Code in the Flutter wiki.
Step 1 - Configure Proguard
Create a /android/app/proguard-rules.pro file and
add the rules listed below.
## Flutter wrapper
-keep class io.flutter.app.** { *; }
-keep class io.flutter.plugin.**  { *; }
-keep class io.flutter.util.**  { *; }
-keep class io.flutter.view.**  { *; }
-keep class io.flutter.**  { *; }
-keep class io.flutter.plugins.**  { *; }
-dontwarn io.flutter.embedding.**
This configuration only protects Flutter engine libraries. Any additional libraries (for example, Firebase) require adding their own rules.
Step 2 - Enable obfuscation and/or minification
Open the /android/app/build.gradle file and locate the buildTypes
definition. Inside the release configuration section,
set the minifiyEnabled and useProguard flags to true.
You must also point Proguard to the file you created in step 1:
android {

    ...

    buildTypes {

        release {

            signingConfig signingConfigs.release

            minifyEnabled true
            useProguard true

            proguardFiles getDefaultProguardFile('proguard-android.txt'), 'proguard-rules.pro'

        }
    }
}
Reviewing the app manifest
Review the default App Manifest file,
AndroidManifest.xml,
located in <app dir>/android/app/src/main and verify that the values
are correct, especially the following:
application- Edit the
android:labelin theapplicationtag to reflect the final name of the app. uses-permission- Add the
android.permission.INTERNETpermission if your application code needs Internet access. The standard template does not include this tag but allows Internet access during development to enable communication between Flutter tools and a running app.
Reviewing the build configuration
Review the default Gradle build file file,
build.gradle, located in <app dir>/android/app and
verify the values are correct, especially the following
values in the defaultConfig block:
applicationId- Specify the final, unique (Application Id)appid
-
versionCode&versionName - Specify the internal app version number,
and the version number display string. You can do this by setting
the
versionproperty in the pubspec.yaml file. Consult the version information guidance in the versions documentation. -
minSdkVersion&targetSdkVersion - Specify the minimum API level, and the API level on which the app is designed to run. Consult the API level section in the versions documentation for details.
Building the app for release
You have two possible release formats when publishing to the Play Store.
- App bundle (preferred)
- APK
Build an app bundle
This section describes how to build a release app bundle. If you completed the signing steps, the app bundle will be signed.
From the command line:
- Enter
cd <app dir>
(Replace<app dir>with your application’s directory.) - Run
flutter build appbundle
(Runningflutter builddefaults to a release build.)
The release bundle for your app is created at
<app dir>/build/app/outputs/bundle/release/app.aab.
By default, the app bundle contains your Dart code and the Flutter runtime compiled for armeabi-v7a (32-bit) and arm64-v8a (64-bit).
Test the app bundle
An app bundle can be tested in multiple ways—this section describes two.
Offline using the bundle tool
- If you haven’t done so already, download
bundletoolfrom the GitHub repository. - Generate a set of APKs from your app bundle.
- Deploy the APKs to connected devices.
Online using Google Play
- Upload your bundle to Google Play to test it. You can use the internal test track, or the alpha or beta channels to test the bundle before releasing it in production.
- Follow these steps to upload your bundle to the Play Store.
Build an APK
Although app bundles are preferred over APKs, there are stores that don’t yet support app bundles. In this case, build a release APK for each target ABI (Application Binary Interface).
If you completed the signing steps, the APK will be signed.
From the command line:
- Enter
cd <app dir>
(Replace<app dir>with your application’s directory.) - Run
flutter build apk --split-per-abi
(Theflutter buildcommand defaults to--release.)
This command results in two APK files:
<app dir>/build/app/outputs/apk/release/app-armeabi-v7a-release.apk<app dir>/build/app/outputs/apk/release/app-arm64-v8a-release.apk
Removing the --split-per-abi flag results in a fat APK that contains
your code compiled for all the target ABIs. Such APKs are larger in
size than their split counterparts, causing the user to download
native binaries that are not applicable to their device’s architecture.
Install an APK on a device
Follow these steps to install the APK on a connected Android device.
From the command line:
- Connect your Android device to your computer with a USB cable.
- Enter
cd <app dir>where<app dir>is your application directory. - Run
flutter install.
Publishing to the Google Play Store
For detailed instructions on publishing your app to the Google Play Store, see the Google Play launch documentation.
Now that you’ve created your app, attract more users with Google Ads. App campaigns use machine learning to drive more installs and make the most of your budget.
Get your campaign running in a few steps:
- Create your ad—we’ll help create your ad from your app information
- Choose your budget—set your target cost-per-install (tCPI) and daily budget cap
- Select your location—let us know where you’d like your ads to run
- Decide what action you want users to take—choose installs, in-app actions, or target return on ad spend (ROAS)
Get $75 app advertising credit when you spend $25.
Updating the app’s version number
The default version number of the app is 1.0.0.
To update it, navigate to the pubspec.yaml file
and update the following line:
version: 1.0.0+1
The version number is three numbers separated by dots,
such as 1.0.0 in the example above, followed by an optional
build number such as 1 in the example above, separated by a +.
Both the version and the build number may be overridden in Flutter’s
build by specifying --build-name and --build-number, respectively.
In Android, build-name is used as versionName while
build-number used as versionCode. For more information,
see Version your app in the Android documentation.
Android release FAQ
Here are some commonly asked questions about deployment for Android apps.
When should I build app bundles versus APKs?
The Google Play Store recommends that you deploy app bundles over APKs because they allow a more efficient delivery of the application to your users. However, if you’re distributing your application by means other than the Play Store, an APK may be your only option.
What is a fat APK?
A fat APK is a single APK that contains binaries for multiple
ABIs embedded within it. This has the benefit that the single APK
runs on multiple architectures and thus has wider compatibility,
but it has the drawback that its file size is much larger,
causing users to download and store more bytes when installing
your application. When building APKs instead of app bundles,
it is strongly recommended to build split APKs,
as described in build an APK using the
--split-per-abi flag.
What are the supported target architectures?
When building your application in release mode, Flutter apps can be compiled for armeabi-v7a (32-bit) and arm64-v8a (64-bit). Flutter does not currently support building for x86 Android (See Issue 9253).
How do I sign the app bundle created by flutter build appbundle?
See Signing the app.
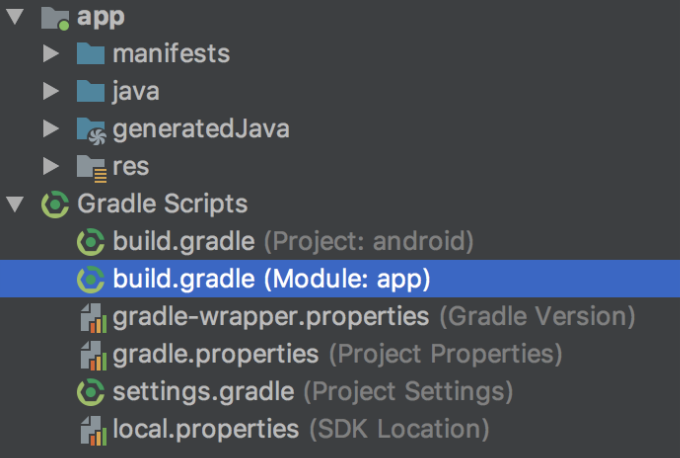
How do I build a release from within Android Studio?
In Android Studio, open the existing android/
folder under your app’s folder. Then,
select build.gradle (Module: app) in the project panel:
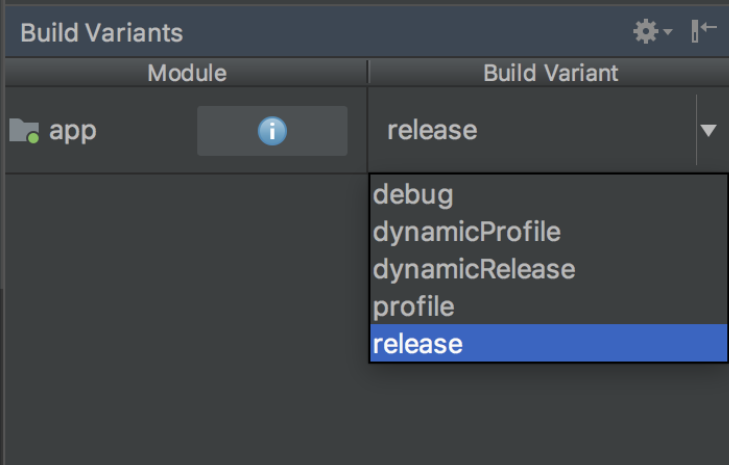
Next, select the build variant. Click Build > Select Build Variant in the main menu. Select any of the variants in the Build Variants panel (debug is the default):
The resulting app bundle or APK files are located in
build/app/outputs within your app’s folder.