Docker container networking
Estimated reading time: 20 minutesThis section provides an overview of Docker’s default networking behavior, including the type of networks created by default and how to create your own user-defined networks. It also describes the resources required to create networks on a single host or across a cluster of hosts.
For details about how Docker interacts with iptables on Linux hosts, see
Docker and iptables.
Default networks
When you install Docker, it creates three networks automatically. You can list
these networks using the docker network ls command:
$ docker network ls

NETWORK ID          NAME                DRIVER
7fca4eb8c647        bridge              bridge
9f904ee27bf5        none                null
cf03ee007fb4        host                host
These three networks are built into Docker. When
you run a container, you can use the --network flag to specify which networks
your container should connect to.
The bridge network represents the docker0 network present in all Docker
installations. Unless you specify otherwise with the docker run
--network=<NETWORK> option, the Docker daemon connects containers to this
network by default. You can see this bridge as part of a host’s network stack by
using the ip addr show command (or short form, ip a) on the host. (The
ifconfig command is deprecated. It may also work or give you a command not
found error, depending on your system.)
$ ip addr show
docker0 Link encap:Ethernet HWaddr 02:42:47:bc:3a:eb
inet addr:172.17.0.1 Bcast:0.0.0.0 Mask:255.255.0.0
inet6 addr: fe80::42:47ff:febc:3aeb/64 Scope:Link
UP BROADCAST RUNNING MULTICAST MTU:9001 Metric:1
RX packets:17 errors:0 dropped:0 overruns:0 frame:0
TX packets:8 errors:0 dropped:0 overruns:0 carrier:0
collisions:0 txqueuelen:0
RX bytes:1100 (1.1 KB) TX bytes:648 (648.0 B)
Running on Docker for Mac or Docker for Windows?
If you are using Docker for Mac (or running Linux containers on Docker for Windows), the
docker network lscommand will work as described above, but theip addr showandifconfigcommands may be present, but will give you information about the IP addresses for your local host, not Docker container networks. This is because Docker uses network interfaces running inside a thin VM, instead of on the host machine itself.To use the
ip addr showorifconfigcommands to browse Docker networks, log on to a Docker machine such as a local VM or on a cloud provider like a Docker machine on AWS or a Docker machine on Digital Ocean. You can usedocker-machine ssh <machine-name>to log on to your local or cloud hosted machines, or a directsshas described on the cloud provider site.
The none network adds a container to a container-specific network stack. That
container lacks a network interface. Attaching to such a container and looking
at its stack you see this:
$ docker attach nonenetcontainer
root@0cb243cd1293:/# cat /etc/hosts
127.0.0.1 localhost
::1 localhost ip6-localhost ip6-loopback
fe00::0 ip6-localnet
ff00::0 ip6-mcastprefix
ff02::1 ip6-allnodes
ff02::2 ip6-allrouters
root@0cb243cd1293:/# ip -4 addr
1: lo: <LOOPBACK,UP,LOWER_UP> mtu 65536 qdisc noqueue qlen 1
inet 127.0.0.1/8 scope host lo
valid_lft forever preferred_lft forever
root@0cb243cd1293:/#
Note: You can detach from the container and leave it running with
CTRL-p CTRL-q.
The host network adds a container on the host’s network stack. As far as the
network is concerned, there is no isolation between the host machine and the
container. For instance, if you run a container that runs a web server on port
80 using host networking, the web server is available on port 80 of the host
machine.
The none and host networks are not directly configurable in Docker.
However, you can configure the default bridge network, as well as your own
user-defined bridge networks.
The default bridge network
The default bridge network is present on all Docker hosts. If you do not
specify a different network, new containers are automatically connected to the
default bridge network.
The docker network inspect command returns information about a network:
$ docker network inspect bridge
[
{
"Name": "bridge",
"Id": "f7ab26d71dbd6f557852c7156ae0574bbf62c42f539b50c8ebde0f728a253b6f",
"Scope": "local",
"Driver": "bridge",
"IPAM": {
"Driver": "default",
"Config": [
{
"Subnet": "172.17.0.1/16",
"Gateway": "172.17.0.1"
}
]
},
"Containers": {},
"Options": {
"com.docker.network.bridge.default_bridge": "true",
"com.docker.network.bridge.enable_icc": "true",
"com.docker.network.bridge.enable_ip_masquerade": "true",
"com.docker.network.bridge.host_binding_ipv4": "0.0.0.0",
"com.docker.network.bridge.name": "docker0",
"com.docker.network.driver.mtu": "9001"
},
"Labels": {}
}
]
Run the following two commands to start two busybox containers, which are each
connected to the default bridge network.
$ docker run -itd --name=container1 busybox
3386a527aa08b37ea9232cbcace2d2458d49f44bb05a6b775fba7ddd40d8f92c
$ docker run -itd --name=container2 busybox
94447ca479852d29aeddca75c28f7104df3c3196d7b6d83061879e339946805c
Inspect the bridge network again after starting two containers. Both of the
busybox containers are connected to the network. Make note of their IP
addresses, which will be different on your host machine than in the example
below.
$ docker network inspect bridge
{[
{
"Name": "bridge",
"Id": "f7ab26d71dbd6f557852c7156ae0574bbf62c42f539b50c8ebde0f728a253b6f",
"Scope": "local",
"Driver": "bridge",
"IPAM": {
"Driver": "default",
"Config": [
{
"Subnet": "172.17.0.1/16",
"Gateway": "172.17.0.1"
}
]
},
"Containers": {
"3386a527aa08b37ea9232cbcace2d2458d49f44bb05a6b775fba7ddd40d8f92c": {
"EndpointID": "647c12443e91faf0fd508b6edfe59c30b642abb60dfab890b4bdccee38750bc1",
"MacAddress": "02:42:ac:11:00:02",
"IPv4Address": "172.17.0.2/16",
"IPv6Address": ""
},
"94447ca479852d29aeddca75c28f7104df3c3196d7b6d83061879e339946805c": {
"EndpointID": "b047d090f446ac49747d3c37d63e4307be745876db7f0ceef7b311cbba615f48",
"MacAddress": "02:42:ac:11:00:03",
"IPv4Address": "172.17.0.3/16",
"IPv6Address": ""
}
},
"Options": {
"com.docker.network.bridge.default_bridge": "true",
"com.docker.network.bridge.enable_icc": "true",
"com.docker.network.bridge.enable_ip_masquerade": "true",
"com.docker.network.bridge.host_binding_ipv4": "0.0.0.0",
"com.docker.network.bridge.name": "docker0",
"com.docker.network.driver.mtu": "9001"
},
"Labels": {}
}
]
Containers connected to the default bridge network can communicate with each
other by IP address. Docker does not support automatic service discovery on the
default bridge network. If you want containers to be able to resolve IP addresses
by container name, you should use user-defined networks instead. You can link
two containers together using the legacy docker run --link option, but this
is not recommended in most cases.
You can attach to a running container to see how the network looks from
inside the container. You are connected as root, so your command prompt is
a # character.
$ docker attach container1
root@3386a527aa08:/# ip -4 addr
1: lo: <LOOPBACK,UP,LOWER_UP> mtu 65536 qdisc noqueue qlen 1
inet 127.0.0.1/8 scope host lo
valid_lft forever preferred_lft forever
633: eth0@if634: <BROADCAST,MULTICAST,UP,LOWER_UP,M-DOWN> mtu 1500 qdisc noqueue
inet 172.17.0.2/16 scope global eth0
valid_lft forever preferred_lft forever
From inside the container, use the ping command to test the network connection
to the IP address of the other container.
root@3386a527aa08:/# ping -w3 172.17.0.3
PING 172.17.0.3 (172.17.0.3): 56 data bytes
64 bytes from 172.17.0.3: seq=0 ttl=64 time=0.096 ms
64 bytes from 172.17.0.3: seq=1 ttl=64 time=0.080 ms
64 bytes from 172.17.0.3: seq=2 ttl=64 time=0.074 ms
--- 172.17.0.3 ping statistics ---
3 packets transmitted, 3 packets received, 0% packet loss
round-trip min/avg/max = 0.074/0.083/0.096 ms
Use the cat command to view the /etc/hosts file on the container. This shows
the hostnames and IP addresses the container recognizes.
root@3386a527aa08:/# cat /etc/hosts
172.17.0.2 3386a527aa08
127.0.0.1 localhost
::1 localhost ip6-localhost ip6-loopback
fe00::0 ip6-localnet
ff00::0 ip6-mcastprefix
ff02::1 ip6-allnodes
ff02::2 ip6-allrouters
To detach from the container1 container and leave it running, use the keyboard
sequence CTRL-p CTRL-q. If you wish, attach to container2 and repeat the
commands above.
The default docker0 bridge network supports the use of port mapping and
docker run --link to allow communications among containers in the docker0
network. This approach is not recommended. Where possible, you should use
user-defined bridge networks instead.
Disable the default bridge network
If you do not want the default bridge network to be created at all, add the
following to the daemon.json file. This only applies when the Docker daemon
runs on a Linux host.
"bridge": "none",
"iptables": "false"
Restart Docker for the changes to take effect.
You can also manually start the dockerd with the flags --bridge=none
--iptables=false. However, this may not start the daemon with the same
environment as the system init scripts, so other behaviors may be changed.
Disabling the default bridge network is an advanced option that most users will not need.
User-defined networks
It is recommended to use user-defined bridge networks to control which containers can communicate with each other, and also to enable automatic DNS resolution of container names to IP addresses. Docker provides default network drivers for creating these networks. You can create a new bridge network, overlay network or MACVLAN network. You can also create a network plugin or remote network for complete customization and control.
You can create as many networks as you need, and you can connect a container to zero or more of these networks at any given time. In addition, you can connect and disconnect running containers from networks without restarting the container. When a container is connected to multiple networks, its external connectivity is provided via the first non-internal network, in lexical order.
The next few sections describe each of Docker’s built-in network drivers in greater detail.
Bridge networks
A bridge network is the most common type of network used in Docker. Bridge
networks are similar to the default bridge network, but add some new features
and remove some old abilities. The following examples create some bridge
networks and perform some experiments on containers on these networks.
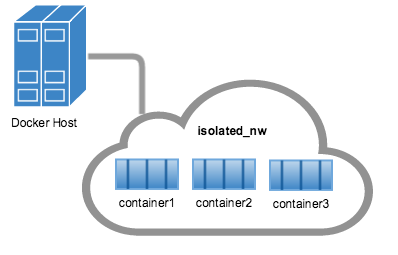
$ docker network create --driver bridge isolated_nw
1196a4c5af43a21ae38ef34515b6af19236a3fc48122cf585e3f3054d509679b
$ docker network inspect isolated_nw
[
{
"Name": "isolated_nw",
"Id": "1196a4c5af43a21ae38ef34515b6af19236a3fc48122cf585e3f3054d509679b",
"Scope": "local",
"Driver": "bridge",
"IPAM": {
"Driver": "default",
"Config": [
{
"Subnet": "172.21.0.0/16",
"Gateway": "172.21.0.1/16"
}
]
},
"Containers": {},
"Options": {},
"Labels": {}
}
]
$ docker network ls
NETWORK ID NAME DRIVER
9f904ee27bf5 none null
cf03ee007fb4 host host
7fca4eb8c647 bridge bridge
c5ee82f76de3 isolated_nw bridge
After you create the network, you can launch containers on it using the
docker run --network=<NETWORK> option.
$ docker run --network=isolated_nw -itd --name=container3 busybox

8c1a0a5be480921d669a073393ade66a3fc49933f08bcc5515b37b8144f6d47c

$ docker network inspect isolated_nw
[
    {
        "Name": "isolated_nw",
        "Id": "1196a4c5af43a21ae38ef34515b6af19236a3fc48122cf585e3f3054d509679b",
        "Scope": "local",
        "Driver": "bridge",
        "IPAM": {
            "Driver": "default",
            "Config": [
                {}
            ]
        },
        "Containers": {
            "8c1a0a5be480921d669a073393ade66a3fc49933f08bcc5515b37b8144f6d47c": {
                "EndpointID": "93b2db4a9b9a997beb912d28bcfc117f7b0eb924ff91d48cfa251d473e6a9b08",
                "MacAddress": "02:42:ac:15:00:02",
                "IPv4Address": "172.21.0.2/16",
                "IPv6Address": ""
            }
        },
        "Options": {},
        "Labels": {}
    }
]
The containers you launch into this network must reside on the same Docker host. Each container in the network can immediately communicate with other containers in the network. Though, the network itself isolates the containers from external networks.
Within a user-defined bridge network, linking is not supported. You can
expose and publish container ports on
containers in this network. This is useful if you want to make a portion of the
bridge network available to an outside network.

A bridge network is useful in cases where you want to run a relatively small
network on a single host. You can, however, create significantly larger networks
by creating an overlay network.
The docker_gwbridge network
The docker_gwbridge is a local bridge network which is automatically created by Docker
in two different circumstances:
-
When you initialize or join a swarm, Docker creates the
docker_gwbridgenetwork and uses it for communication among swarm nodes on different hosts. -
When none of a container’s networks can provide external connectivity, Docker connects the container to the
docker_gwbridgenetwork in addition to the container’s other networks, so that the container can connect to external networks or other swarm nodes.
You can create the docker_gwbridge network ahead of time if you need a custom configuration,
but otherwise Docker creates it on demand. The following example creates the docker_gwbridge
network with some custom options.
$ docker network create --subnet 172.30.0.0/16 \
                        --opt com.docker.network.bridge.name=docker_gwbridge \
			--opt com.docker.network.bridge.enable_icc=false \
			docker_gwbridge
The docker_gwbridge network is always present when you use overlay networks.
Overlay networks in swarm mode
You can create an overlay network on a manager node running in swarm mode without an external key-value store. The swarm makes the overlay network available only to nodes in the swarm that require it for a service. When you create a service that uses the overlay network, the manager node automatically extends the overlay network to nodes that run service tasks.
To learn more about running Docker Engine in swarm mode, refer to the Swarm mode overview.
The example below shows how to create a network and use it for a service from a manager node in the swarm:
$ docker network create \
  --driver overlay \
  --subnet 10.0.9.0/24 \
  my-multi-host-network

400g6bwzd68jizzdx5pgyoe95

$ docker service create --replicas 2 --network my-multi-host-network --name my-web nginx

716thylsndqma81j6kkkb5aus
Only swarm services can connect to overlay networks, not standalone containers. For more information about swarms, see Docker swarm mode overlay network security model and Attach services to an overlay network.
An overlay network without swarm mode
If you are not using Docker Engine in swarm mode, the overlay network requires
a valid key-value store service. Supported key-value stores include Consul,
Etcd, and ZooKeeper (Distributed store). Before creating a network in this way,
you must install and configure your chosen key-value store service. The Docker
hosts that you intend to network and the service must be able to communicate.
Note: Docker Engine running in swarm mode is not compatible with networking with an external key-value store.
This way of using overlay networks is not recommended for most Docker users. It can be used with standalone swarms and may be useful to system developers building solutions on top of Docker. It may be deprecated in the future. If you think you may need to use overlay networks in this way, see this guide.
Custom network plugins
If your needs are not addressed by any of the above network mechanisms, you can write your own network driver plugin, using Docker’s plugin infrastructure. The plugin will run as a separate process on the host which runs the Docker daemon. Using network plugins is an advanced topic.
Network plugins follow the same restrictions and installation rules as other plugins. All plugins use the plugin API, and have a lifecycle that encompasses installation, starting, stopping, and activation.
Once you have created and installed a custom network driver, you can create
a network which uses that driver with the --driver flag.
$ docker network create --driver weave mynet
You can inspect the network, connect and disconnect containers from it, and remove it. A specific plugin may have specific requirements in order to be used. Check that plugin’s documentation for specific information. For more information on writing plugins, see Extending Docker and Writing a network driver plugin.
Embedded DNS server
Docker daemon runs an embedded DNS server which provides DNS resolution among
containers connected to the same user-defined network, so that these containers
can resolve container names to IP addresses. If the embedded DNS server is
unable to resolve the request, it will be forwarded to any external DNS servers
configured for the container. To facilitate this when the container is created,
only the embedded DNS server reachable at 127.0.0.11 will be listed in the
container’s resolv.conf file. For more information on embedded DNS server on
user-defined networks, see
embedded DNS server in user-defined networks
Exposing and publishing ports
In Docker networking, there are two different mechanisms that directly involve network ports: exposing and publishing ports. This applies to the default bridge network and user-defined bridge networks.
- You expose ports using the
EXPOSEkeyword in the Dockerfile or the--exposeflag todocker run. Exposing ports is a way of documenting which ports are used, but does not actually map or open any ports. Exposing ports is optional. -
You publish ports using the
--publishor--publish-allflag todocker run. This tells Docker which ports to open on the container’s network interface. When a port is published, it is mapped to an available high-order port (higher than30000) on the host machine, unless you specify the port to map to on the host machine at runtime. You cannot specify the port to map to on the host machine when you build the image (in the Dockerfile), because there is no way to guarantee that the port will be available on the host machine where you run the image.This example publishes port 80 in the container to a random high port (in this case,
32768) on the host machine. The-dflag causes the container to run in the background so you can issue thedocker pscommand.$ docker run -it -d -p 80 nginx $ docker ps 64879472feea nginx "nginx -g 'daemon ..." 43 hours ago Up About a minute 443/tcp, 0.0.0.0:32768->80/tcp blissful_mcleanThe next example specifies that port 80 should be mapped to port 8080 on the host machine. It will fail if port 8080 is not available.
$ docker run -it -d -p 8080:80 nginx

$ docker ps

b9788c7adca3        nginx               "nginx -g 'daemon ..."   43 hours ago        Up 3 seconds        80/tcp, 443/tcp, 0.0.0.0:8080->80/tcp   goofy_brahmagupta
Use a proxy server with containers
If your container needs to use an HTTP, HTTPS, or FTP proxy server, you can configure it in different ways:
-
In Docker 17.07 and higher, you can configure the Docker client to pass proxy information to containers automatically.
-
In Docker 17.06 and lower, you must set appropriate environment variables within the container. You can do this when you build the image (which makes the image less portable) or when you create or run the container.
Configure the Docker Client
Edge only: This option is only available in Docker CE Edge versions. See Docker CE Edge.
-
On the Docker client, create or edit the file
~/.config.jsonin the home directory of the user which starts containers. Add JSON such as the following, substituting the type of proxy withhttpsProxyorftpProxyif necessary, and substituting the address and port of the proxy server. You can configure multiple proxy servers at the same time.You can optionally exclude hosts or ranges from going through the proxy server by setting a
noProxykey to one or more comma-separated IP addresses or hosts. Using the*character as a wildcard is supported, as shown in this example.{ "proxies": { "default": { "httpProxy": "http://127.0.0.1:3001", "noProxy": "*.test.example.com,.example2.com" } } }Save the file.
-
When you create or start new containers, the environment variables will be set automatically within the container.
Set the environment variables manually
When you build the image, or using the --env flag when you create or run the
container, you can set one or more of the following variables to the appropriate
value. This method makes the image less portable, so if you have Docker 17.07
or higher, you should configure the Docker client
instead.
| Variable | Dockerfile example | docker run Example |
|---|---|---|
HTTP_PROXY |
ENV HTTP_PROXY "http://127.0.0.1:3001" |
--env HTTP_PROXY "http://127.0.0.1:3001" |
HTTPS_PROXY |
ENV HTTPS_PROXY "https://127.0.0.1:3001" |
--env HTTPS_PROXY "https://127.0.0.1:3001" |
FTP_PROXY |
ENV FTP_PROXY "ftp://127.0.0.1:3001" |
--env FTP_PROXY "ftp://127.0.0.1:3001" |
NO_PROXY |
ENV NO_PROXY "*.test.example.com,.example2.com" |
--env NO_PROXY "*.test.example.com,.example2.com" |
Links
Before Docker included user-defined networks, you could use the Docker --link
feature to allow a container to resolve another container’s name to an IP
address, and also give it access to the linked container’s environment variables.
Where possible, you should avoid using the legacy --link flag.
When you create links, they behave differently when you use the default bridge
network or when you use user-defined bridge networks. For more information,
see Legacy Links for link feature
in default bridge network and the
linking containers in user-defined networks
for links functionality in user-defined networks.
Docker and iptables
Linux hosts use a kernel module called iptables to manage access to network
devices, including routing, port forwarding, network address translation (NAT),
and other concerns. Docker modifies iptables rules when you start or stop
containers which publish ports, when you create or modify networks or attach
containers to them, or for other network-related operations.
Full discussion of iptables is out of scope for this topic. To see which
iptables rules are in effect at any time, you can use iptables -L. Multiple
tables exist, and you can list a specific table, such as nat, prerouting, or
postrouting, using a command such as iptables -t nat -L. For full
documentation about iptables, see
netfilter/iptables.
Typically, iptables rules are created by an initialization script or a daemon
process such as firewalld. The rules do not persist across a system reboot, so
the script or utility must run when the system boots, typically at run-level 3
or directly after the network is initialized. Consult the networking
documentation for your Linux distribution for suggestions about the appropriate
way to make iptables rules persistent.
Docker dynamically manages iptables rules for the daemon, as well as your
containers, services, and networks. In Docker 17.06 and higher, you can add
rules to a new table called DOCKER-USER, and these rules will be loaded before
any rules Docker creates automatically. This can be useful if you need to
pre-populate iptables rules that need to be in place before Docker runs.
Related information
- Work with network commands
- Get started with multi-host networking
- Managing Data in Containers
- Docker Machine overview
- Docker Swarm overview
- Investigate the LibNetwork project