Work on your issue
Estimated reading time: 5 minutesThe work you do depends on the specific issue you picked. This section gives you a step-by-step workflow. Where appropriate, it provides command examples.
However, this is a generalized workflow, depending on your issue you may repeat steps or even skip some. How much time the work takes depends on you — you could spend days or 30 minutes of your time.
How to work on your local branch
Follow this workflow as you work:
-
Review the appropriate style guide.
If you are changing code, review the coding style guide. Changing documentation? Review the documentation style guide.
-
Make changes in your feature branch.
Your feature branch is created in the last section. Here you use the development container. If you are making a code change, you can mount your source into a development container and iterate that way. For documentation alone, you can work on your local host.
Make sure you don’t change files in the
vendordirectory and its subdirectories; they contain third-party dependency code. Review if you forgot the details of working with a container. -
Test your changes as you work.
If you have followed along with the guide, you know the
make testtarget runs the entire test suite andmake docsbuilds the documentation. If you forgot the other test targets, see the documentation for testing both code and documentation. -
For code changes, add unit tests if appropriate.
If you add new functionality or change existing functionality, you should add a unit test also. Use the existing test files for inspiration. Aren’t sure if you need tests? Skip this step; you can add them later in the process if necessary.
-
Format your source files correctly.
File type How to format .goFormat
.gofiles using thegofmtcommand. For example, if you edited thedocker.gofile you would format the file like this:$ gofmt -s -w docker.goMost file editors have a plugin to format for you. Check your editor's documentation.
.mdand non-.gofilesWrap lines to 80 characters. -
List your changes.
 $ git status
 On branch 11038-fix-rhel-link
 Changes not staged for commit:
   (use "git add <file>..." to update what will be committed)
   (use "git checkout -- <file>..." to discard changes in working directory)

 modified:   docs/installation/mac.md
 modified:   docs/installation/rhel.md
The
statuscommand lists what changed in the repository. Make sure you see the changes you expect. -
Add your change to Git.
$ git add docs/installation/mac.md $ git add docs/installation/rhel.md -
Commit your changes making sure you use the
-sflag to sign your work.$ git commit -s -m "Fixing RHEL link" -
Push your change to your repository.
 $ git push origin 11038-fix-rhel-link
 Username for 'https://github.com': moxiegirl
 Password for 'https://moxiegirl@github.com':
 Counting objects: 60, done.
 Compressing objects: 100% (7/7), done.
 Writing objects: 100% (7/7), 582 bytes | 0 bytes/s, done.
 Total 7 (delta 6), reused 0 (delta 0)
 To https://github.com/moxiegirl/docker.git
  * [new branch]      11038-fix-rhel-link -> 11038-fix-rhel-link
 Branch 11038-fix-rhel-link set up to track remote branch 11038-fix-rhel-link from origin.
Review your branch on GitHub
After you push a new branch, you should verify it on GitHub:
-
Open your browser to GitHub.
-
Go to your Docker fork.
-
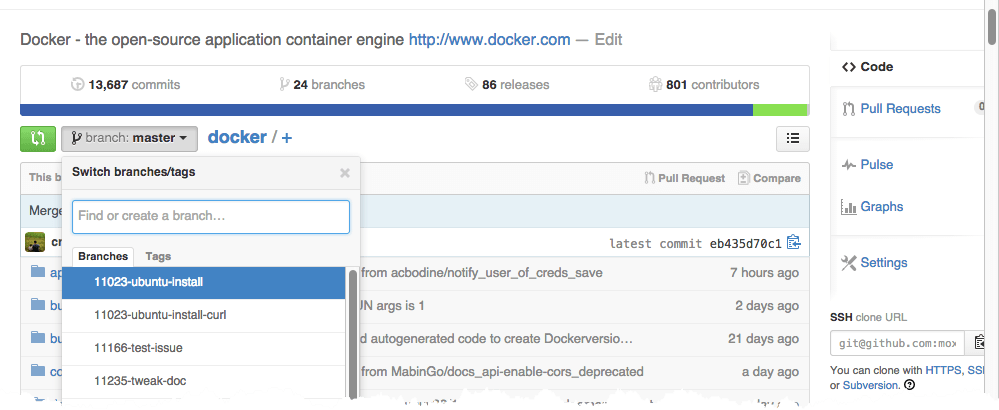
Select your branch from the dropdown.

-
Use the “Compare” button to compare the differences between your branch and master.
Depending how long you’ve been working on your branch, your branch maybe behind Docker’s upstream repository.
-
Review the commits.
Make sure your branch only shows the work you’ve done.
Pull and rebase frequently
You should pull and rebase frequently as you work.
-
Return to the terminal on your local machine and checkout your feature branch in your local
docker-forkrepository. -
Fetch any last minute changes from
docker/docker.$ git fetch upstream master From github.com:docker/docker * branch master -> FETCH_HEAD -
Start an interactive rebase.
$ git rebase -i upstream/master -
Rebase opens an editor with a list of commits.
pick 1a79f55 Tweak some of the other text for grammar pick 53e4983 Fix a link pick 3ce07bb Add a new line about RHEL -
Replace the
pickkeyword withsquashon all but the first commit.pick 1a79f55 Tweak some of the other text for grammar squash 53e4983 Fix a link squash 3ce07bb Add a new line about RHELAfter you save the changes and quit from the editor, git starts the rebase, reporting the progress along the way. Sometimes your changes can conflict with the work of others. If git encounters a conflict, it stops the rebase, and prints guidance for how to correct the conflict.
-
Edit and save your commit message.
$ git commit -sMake sure your message includes your signature.
-
Force push any changes to your fork on GitHub.
$ git push -f origin 11038-fix-rhel-link
Where to go next
At this point, you should understand how to work on an issue. In the next section, you learn how to make a pull request.
contribute, pull request, review, workflow, beginner, squash, commit